When working with Rancher Desktop on Windows 11, your containers, images, and volumes live inside a hidden WSL2 virtual disk (VHDX), usually tucked away on your C: drive.
That’s fine for quick experiments but what if you’re pulling lots of images, running multiple clusters, or working with large databases? That VHDX file can grow fast and eat precious space on your system disk.
The good news: you can safely move Rancher Desktop’s container storage to another drive without losing your data. The trick is using WSL2’s export/import commands, which let you relocate the backing distro (rancher-desktop-data) to a custom path.
This guide walks you through the full process.
Why move Rancher storage?
- Free up space on your
C:drive - Put container data on a larger or faster SSD
- Organize work/projects on a dedicated drive
- Backup and restore Rancher Desktop more easily
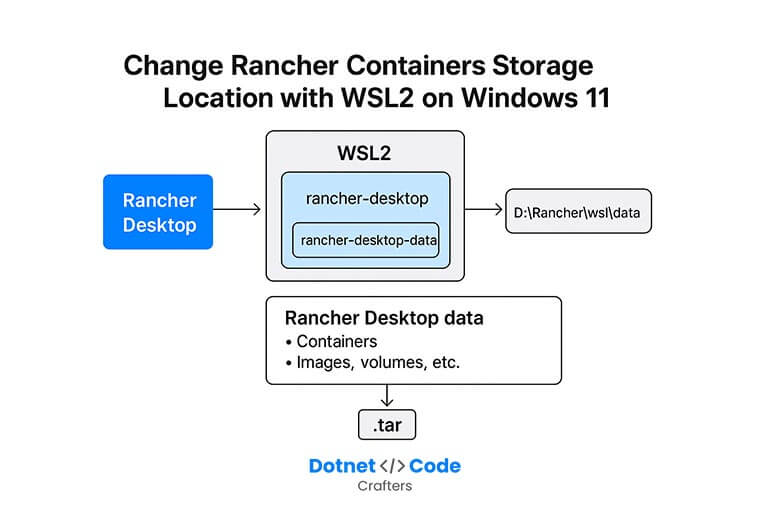
How Rancher Desktop stores data
Rancher Desktop creates two WSL2 distros:
rancher-desktop→ runtime VM (container engine, Kubernetes if enabled)rancher-desktop-data→ all your container storage (images, volumes, etc.)
That -data distro is what we need to move.
By default, it lives under:
%LOCALAPPDATA%\Docker\wsl\dataor
%USERPROFILE%\AppData\Local\RancherDesktop\Step-by-step: Moving Rancher Desktop data to another drive
⚠️ Important: Backup first. Export creates a .tar archive of all your data. Don’t skip it.
We’ll assume you want to move Rancher’s data to D:\Rancher\wsl\data.
1. Quit Rancher Desktop
Make sure Rancher Desktop is not running. Exit from the tray icon.
2. Check current WSL distros
Open PowerShell and run:
wsl --list --verboseExpected output:
  NAME                   STATE     VERSION
  rancher-desktop        Stopped   2
  rancher-desktop-data   Stopped   2
3. Shut down WSL
wsl --shutdownThis ensures nothing is running.
4. Create a destination folder
mkdir D:\Rancher\wsl\data5. Export the Rancher data distro
wsl --export rancher-desktop-data "D:\Rancher\wsl\data\rancher-desktop-data.tar"This may take several minutes depending on the size of your images/volumes.
6. Unregister the old distro
wsl --unregister rancher-desktop-dataThis deletes the old .vhdx file from its system location.
Don’t worry — you still have the .tar backup.
7. Import Rancher data into the new location
wsl --import rancher-desktop-data "D:\Rancher\wsl\data" "D:\Rancher\wsl\data\rancher-desktop-data.tar" --version 2WSL will now create a new .vhdx in D:\Rancher\wsl\data.
8. (Optional) Clean up the tar file
Once you confirm Rancher works again:
del "D:\Rancher\wsl\data\rancher-desktop-data.tar"9. Restart Rancher Desktop
Open the app. It will attach to the relocated rancher-desktop-data and start normally.
Check containers with:
docker psTroubleshooting
- Containers stuck “loading” in Rancher GUI
→ Try restarting Rancher Desktop. If still stuck, unregisterrancher-desktop(notrancher-desktop-data!) and let Rancher recreate it. wsl --importfails with ERROR_ALREADY_EXISTS
→ You forgot to unregister the old distro. Run:
wsl --unregister rancher-desktop-datathen retry.
rdctl shell says distro is stopped
→ Start Rancher Desktop first. It controls the rancher-desktop runtime.
Why not use symlinks?
work, it’s fragile and can break with Rancher/Desktop or WSL updates.
Using WSL’s official export/import keeps things clean and supported.
Summary
You can relocate Rancher Desktop’s container storage in WSL2 with just a few commands:
wsl --shutdown
wsl --export rancher-desktop-data D:\Rancher\wsl\data\rancher-desktop-data.tar
wsl --unregister rancher-desktop-data
wsl --import rancher-desktop-data D:\Rancher\wsl\data D:\Rancher\wsl\data\rancher-desktop-data.tar --version 2
This moves your containers, images, and volumes to a new drive while keeping everything intact.
It’s a lifesaver if your C: drive is running out of space or if you just want to better organize your development environment.
Change Docker Containers Storage Location with WSL2 on Windows 11
If you’re using Docker Desktop instead of Rancher Desktop, you can also move your container and image data to another drive — for example, from C: to D: — using WSL2 export/import.
This helps free up space on your main drive and makes backups easier.
Let’s walk through the complete process step by step.
1: Check Current Docker WSL Distributions
First, open PowerShell and run:
wsl -l -vYou’ll typically see something like:
  NAME                   STATE           VERSION
* docker-desktop         Running         2
  docker-desktop-data    Running         2
Here:
docker-desktopholds the actual runtime environment.docker-desktop-datais where Docker stores all containers, images, and volumes — this is the one we’ll move.
2: Stop Docker Desktop Completely
Before exporting, make sure Docker isn’t running.
Right-click the Docker Desktop icon in your system tray and select “Quit Docker Desktop.”
Export the Docker Data to a .tar File
Now export the docker-desktop-data distribution:
wsl --export docker-desktop-data D:\Docker\wsl\docker-desktop-data.tar💡 Tip: Choose a drive and folder (like
D:\Docker\wsl) with enough free space for all your existing images and volumes. This file can be quite large.
This command creates a backup of your entire Docker data store in a tar archive.
4: Unregister the Old Docker Data Distribution
Once export is complete, remove the old data distribution:
wsl --unregister docker-desktop-dataThis deletes Docker’s existing WSL2 data storage (but you still have your .tar backup, so nothing is lost).
5: Re-Import Docker Data to New Drive
Now re-import it to the new location, for example D:\Docker\wsl\data:
wsl --import docker-desktop-data "D:\Docker\wsl\data" "D:\Docker\wsl\docker-desktop-data.tar" --version 2This command:
- Creates a new WSL2 distribution named
docker-desktop-data - Stores it in
D:\Docker\wsl\data - Loads the contents from your
.tarbackup
Verify Import Was Successful
Run:
wsl -l -vYou should now see:
  NAME                   STATE           VERSION
* docker-desktop-data    Stopped         2
  docker-desktop         Stopped         2
Everything looks good — the data distribution now lives on your new drive.
Restart Docker Desktop
Now simply start Docker Desktop again from the Start menu.
It should automatically detect the moved WSL2 distribution and boot up as usual.
To confirm everything is working:
docker psIf you see your containers listed (or none if clean), the migration succeeded.
8: (Optional) Check New Storage Location in File Explorer
You can open your new location (e.g., D:\Docker\wsl\data) and verify that WSL files are stored there:
ext4.vhdxThat .vhdx file contains your entire Docker data volume in virtualized form.
This approach gives you full control over where Docker (and Rancher) stores their container data under WSL2.
It’s clean, safe, and reversible — no registry edits or hacks needed.
